
Life hacks for room painting: homeowners' guide
- WM Creative Designs Limited
- Aug 2
- 9 min read

TL;DR:
Using an extended 18-inch roller saves time and maintains a wet edge, reducing ladder movements. Thorough preparation, including cleaning and priming, prevents peeling and enhances adhesion. Hiring experienced professionals with clear scope and insurance ensures efficient, durable painting results.
The biggest time and quality gains in room painting come from three things: the right tool combination, thorough preparation, and a two-person workflow. Everything else is marginal. Here is a shortlist you can act on now or hand straight to your contractor:
Use an 18-inch roller on an extension pole to maintain a wet edge without climbing a ladder
Keep a lint-free microfibre sleeve ready before you load any paint
Clean walls to remove dust and oils before a single drop of paint goes on
Fill and sand all holes, then prime those spots before the main coat
Mask trim and sockets with quality tape, and peel it at 45° while paint is still tacky
Work ceiling first, then walls, then trim — never the other way round
Use a two-person cut-and-roll method on interior walls for markedly faster coverage
Allow a couple of hours between coats under normal indoor conditions
Abrushwithgus, the family-run painting and decorating team serving Cornwall and the South West, applies every one of these on a typical job. The sections below explain why each hack works and how to use them whether you are picking up a brush yourself or briefing a professional.
Table of Contents
Which tools genuinely cut the time to paint a room?
The 18-inch roller on an extension pole is the single biggest time-saver available to any painter. It covers roughly twice the area per stroke of a standard 9-inch roller, and the pole keeps you off the ladder for the majority of the wall. Fewer ladder moves means a continuous wet edge, which is what prevents lap marks. See the essential tools guide for a full breakdown of what to buy or request.
The rest of the kit matters too:
Angled sash brush (2–2.5 inch): cuts a clean line at ceiling junctions and around trim without tape on every edge
Paint tray with disposable liners: swap liners between colours in seconds rather than washing out the tray
Microfibre roller covers: hold more paint, release it more evenly, and leave a smoother finish than foam
Cut pot with a handle: lets the cutter move freely around the room without returning to the main tray
For large exterior jobs or kitchen spraying, an airless sprayer covers surface area far faster than any roller. It is worth asking your professional whether airless is appropriate for your project — Abrushwithgus uses airless spraying for exterior work and UPVC restoration where the speed and finish quality justify it.
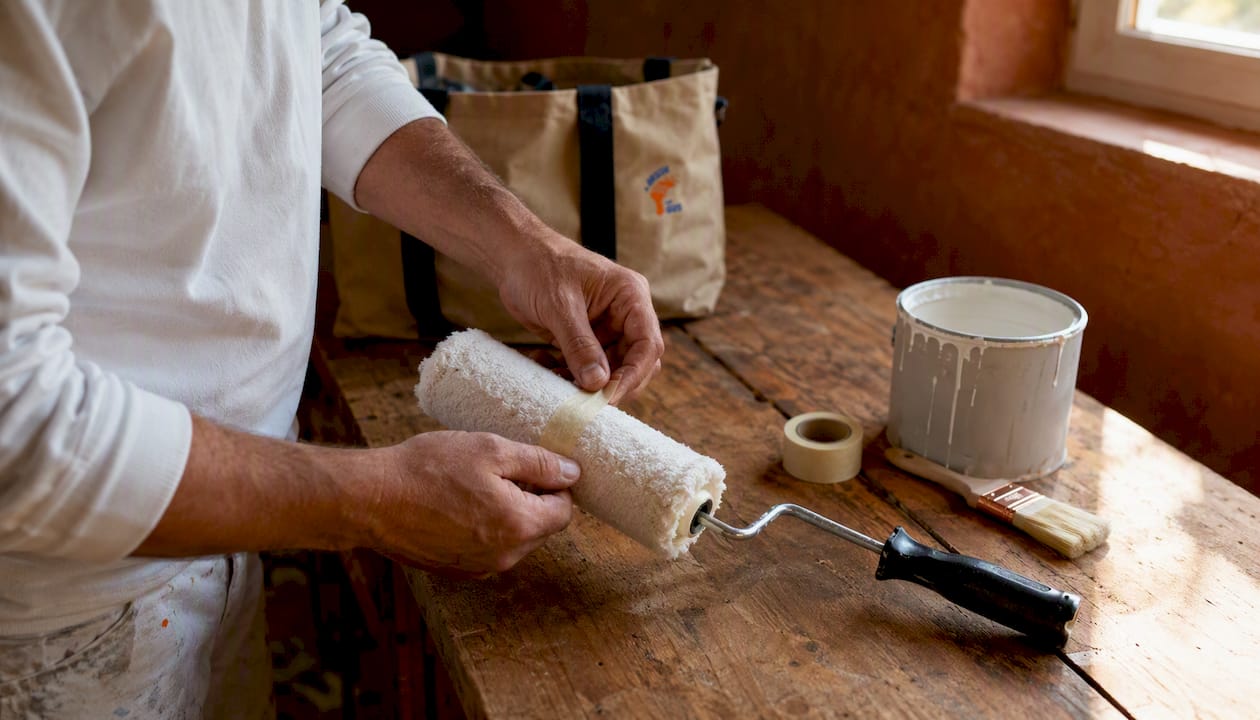
Pro Tip: Before loading any roller sleeve, wrap it in masking tape and peel it off. The tape pulls loose fibres from the cover that would otherwise end up embedded in your finish.
What prep do professionals never skip?
Prep is where most DIY and even some professional jobs go wrong. Skipping wall cleaning is the single most common cause of peeling, regardless of how good the paint is. Dust and oils break the bond between the surface and the new coat.
The rule professionals follow: clean first, fill second, prime third. Any other order adds rework later.
Clear small furniture from the room; push large pieces to the centre and cover with dust sheets
Wipe walls with a damp cloth from top to bottom to remove dust, then degrease problem areas (kitchens, around light switches) with a sugar soap solution
Fill holes and cracks with a ready-mixed filler, allow to dry fully, then sand smooth with 220-grit paper
Vacuum sanding dust, then wipe again with a barely damp cloth
Mask trim, sockets, and skirting boards with quality painter’s tape
Lay dust sheets on the floor — canvas holds better than plastic, which slides
What to leave for the professionals: removing loose or bubbled wallpaper, addressing damp patches, and any filling deeper than about 5mm. These affect adhesion in ways that need experience to assess properly.
How do professional painters work a room efficiently?
The two-person cut-and-roll method is the most efficient approach for interior walls. One person cuts an 8–10 foot strip along the ceiling line and around obstacles with an angled brush; the other follows immediately with the roller, blending the cut edge before it dries. The result is a seamless finish with no visible brush marks at the edges.
Sequence matters too:
Paint the ceiling first so any drips land on unpainted walls
Move to the walls, working in full-height strips from one corner
Finish with trim, doors, and skirting boards last
Pro Tip: Turn off artificial work lights when assessing your finish. Direct work lighting exaggerates surface texture and leads painters to chase imperfections that are invisible under normal living light — adding unnecessary touch-up time.
As a homeowner or property manager, the most useful thing you can do is give the team unobstructed access, confirm the room sequence in advance, and leave a contact number for decisions about colour or problem areas. Interruptions to ask about furniture placement or paint choices cost more time than most people realise.
When should you recoat? Drying times explained
Standard interior emulsion reaches dry to the touch within a few hours under normal conditions. That is the minimum window before a second coat, not a guarantee of full adhesion. Most guides, including Behr’s step-by-step process, recommend waiting until the first coat is fully dry before recoating.
Paint type | Dry to touch | Safe to recoat |
Standard emulsion (interior) | several hours | several hours |
Eggshell / satin | several hours | several hours |
Gloss / semi-gloss | several hours | longer drying times |
Primer | relatively quick drying | moderate drying time |
Several factors push those windows out significantly:
Cold rooms (below 10°C) slow solvent evaporation
High humidity, common in coastal Cornwall, extends drying noticeably
Porous or previously unpainted surfaces absorb the first coat unevenly, requiring longer before recoating
Thick application — more paint does not mean better coverage, it means longer drying
Pro Tip: Avoid turning on ceiling fans or opening windows directly onto a wet wall. Forced airflow causes flash drying at the surface while the coat beneath stays wet, which traps moisture and can cause bubbling. Introduce ventilation only after the wall surface is fully coated.
Small steps homeowners can take before the painter arrives
A little organisation on your side saves real time on the job, which often translates directly to cost.
Move all small items, wall art, and breakables out of the room before the team arrives
Label each room with your priority order if multiple rooms are being done
Leave clear parking and easy access — a van full of equipment needs a close drop-off point
Provide keys, gate codes, or alarm instructions in writing, not just verbally
Mark any problem areas (damp patches, cracks, stained sections) with a sticky note so the painter can assess them immediately
On paint choices: eggshell or satin finish works well for most interior walls — it is easier to wipe clean than flat emulsion and holds up better in high-traffic areas. Semi-gloss is the right call for trim, skirting, and doors. For choosing the right sheen and paint type, the difference matters more than most homeowners expect.
On primer: if you are covering a dark colour, new plaster, or bare wood, a separate primer coat is worth the extra time. For repaints in good condition, a paint-and-primer combined product is a reasonable shortcut.
Common mistakes that add hours to any paint job
Most time-wasting errors are avoidable with one small change in approach.
Inadequate cleaning: paint applied over greasy or dusty walls peels within months. A 20-minute clean saves a full repaint.
Wrong roller nap: a 10mm nap suits smooth walls; a 15mm nap is for textured surfaces. Using the wrong one leaves either a stippled finish or poor coverage.
Over-lighting during inspection: work lights reveal every micro-texture. Assess the finish under the room’s normal lighting before deciding anything needs touching up.
Removing tape too late: dried paint tears when the tape is pulled, leaving a ragged edge. Peel while the paint is still slightly tacky.
Poor tape choice: cheap tape bleeds paint underneath. Use a quality low-tack painter’s tape on delicate surfaces.
On tape removal: peel slowly at a 45° angle back over itself, not straight out from the wall. This shears the paint film cleanly rather than lifting it. Do it while the paint is still wet or tacky — never after it has fully hardened.
When prepping doors and frames, it is also worth checking for any underlying damage before painting over it. Common door preparation mistakes can undermine an otherwise good paint job if the surface beneath is not sound.
How to brief and choose a professional painter in the South West UK
Hiring well saves more time and money than any single painting trick. Ask these questions before signing anything:
How many similar properties have you painted in this area?
Are you fully insured for public liability and employer’s liability?
Can you provide two or three recent references or a portfolio?
What is your estimated timeline, and what could extend it?
Which paint brands and primer products do you use, and why?
Do you offer any warranty on the finish?
Request a written quote that specifies the number of coats, the prep scope, and the products to be used. Vague quotes (“paint two rooms”) without detail on prep are a red flag.
Red flags to watch for:
No public liability insurance — walk away
Pressure to accept a verbal quote with no written scope
Unwillingness to provide references or show previous work
A timeline that sounds too fast for the scope described
Asking for full payment upfront before work begins
On the day: confirm the room priority order in writing, leave a contact number for decisions, and do a brief walkthrough with the painter to point out any problem areas before they start.
Key takeaways
Prep and workflow deliver the biggest returns in any paint job — shortcuts in materials rarely compensate for skipping either.
Point | Details |
Tool combination matters | An 18-inch roller on an extension pole cuts time by reducing ladder movement and maintaining a wet edge. |
Clean before you coat | Removing dust and oils before painting is the single most effective way to prevent peeling and adhesion failure. |
Recoat timing | Standard interior emulsion needs 1–2 hours dry-to-touch; eggshell and satin need 2–3 hours before a second coat. |
Hire with evidence | Ask for insurance, references, and a written scope — vague quotes and no documentation are the clearest red flags. |
Abrushwithgus | The South West’s family-run team applies these hacks on every job; get a quote for domestic painting, exterior work, or UPVC spraying. |
What working in Cornwall actually teaches you about painting
The South West presents conditions you do not encounter in a dry inland property. Coastal humidity extends drying times noticeably, older timber-framed homes need more careful prep around window frames and sills, and the salt air accelerates surface degradation on anything exterior. These are not abstract concerns — they are the reason prep cannot be rushed here the way it sometimes is elsewhere.
What the Abrushwithgus team has found, job after job, is that the homeowners who get the best results are the ones who treat prep as the job, not the preamble to it. A wall that is properly cleaned, filled, and primed will hold a finish for years longer than one that was painted quickly over whatever was there before. The portfolio of completed projects on the Abrushwithgus site reflects that — the transformations that look most dramatic are almost always the ones where the prep was most thorough.
The professional techniques Gus and Rhys bring to each job are not secrets. They are the same hacks described in this article, applied consistently and without shortcuts. That consistency is what produces a finish that holds up.
Ready to hand the brushes over? Here is how Abrushwithgus can help
Knowing the hacks is one thing. Having a team that applies them reliably on your property is another. Abrushwithgus is a family-run painting and decorating service covering Cornwall and the South West, offering domestic interior and exterior painting, UPVC spraying, and exterior home cleaning — all with the prep-first approach this article describes.

Gus and Rhys bring the two-person workflow, the right tool kit, and the local knowledge of South West conditions to every job. Client reviews and a portfolio of completed projects are on the site. To get a written quote with a clear scope and timeline, get in touch with the team directly — no vague estimates, no pressure.
Recommended
Comments