
How to prepare commercial walls for painting
- WM Creative Designs Limited
- May 27
- 9 min read
TL;DR:
Proper wall preparation is crucial for lasting commercial finishes, focusing on thorough cleaning, drying, and suitable repairs before priming. Using the correct tools, maintaining ideal temperatures, and scheduling work around operations ensure optimal adhesion and durability. The biggest difference in long-term appearance lies in meticulous repair, feathering, and priming techniques during preparation.
Getting the finish wrong on commercial walls is rarely about the paint itself. More often, it comes down to how to prepare commercial walls before a single drop of colour is applied. For facility managers and commercial property owners, a failed finish means downtime, rework costs, and a space that looks tired within months. This guide walks you through every stage of preparation, from the tools you need to the pitfalls that catch even experienced teams off guard, so you can get a result that lasts.
Table of Contents
Key takeaways
Point | Details |
Preparation determines longevity | Wall prep quality directly affects how long paint holds up in high-traffic commercial spaces. |
Clean before you repair | Grease, dust, and residue must be removed before any repairs or primer are applied. |
Dry time is non-negotiable | Allow a minimum of 24 hours drying time after cleaning before moving to repair or priming stages. |
Match primer to the surface | Repaired, porous, or specialist surfaces each need a different primer type for proper adhesion. |
Temperature matters throughout | Maintain conditions of 65 to 75°F during preparation and application to avoid adhesion failure. |
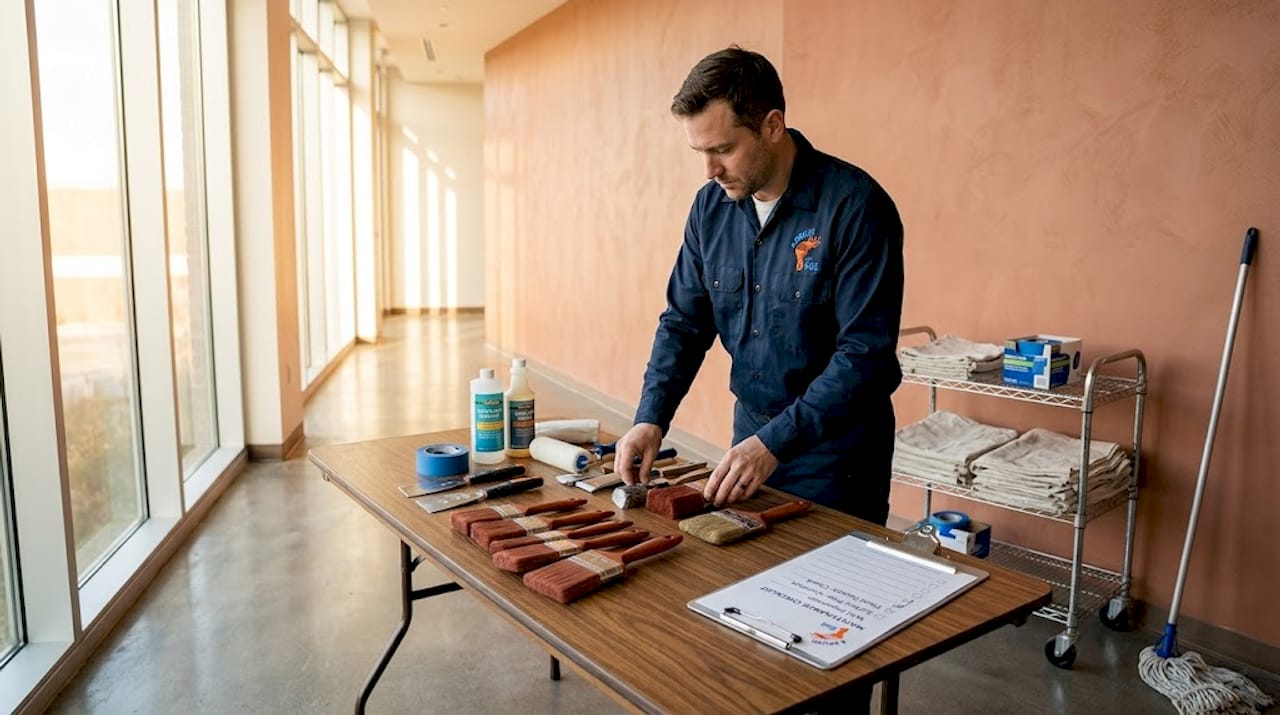
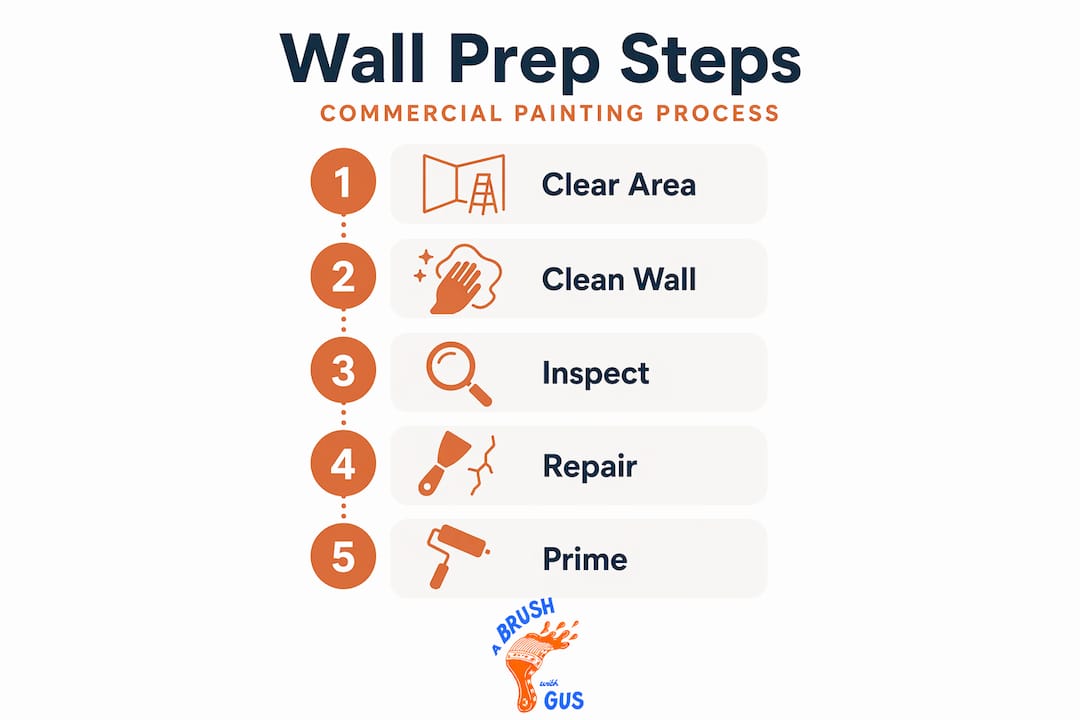
How to prepare commercial walls: tools and materials
Before you touch a wall, you need the right kit assembled and a clear workspace. This stage is where commercial projects most often come unstuck, because people underestimate how different the material requirements are compared to a residential job.
Tool or material | Purpose | Recommendation |
TSP substitute | Degreasing and deep cleaning | Use on high-traffic or kitchen-adjacent walls |
Spackling compound | Filling small holes and cracks | Pre-mixed for shallow repairs |
Joint compound | Larger gaps and panel repairs | Setting-type for faster drying |
Sandpaper (80 to 220 grit) | Surface smoothing and repair blending | Buy a range; do not start fine |
Sanding block | Flat, controlled sanding | Critical for feathering repairs evenly |
Dust mask (FFP2 rated) | Respiratory protection during sanding | Non-negotiable in commercial spaces |
Safety goggles | Eye protection | Required when using chemical cleaners |
Bucket, sponges, soft cloths | Washing and rinsing walls | Use separate buckets for wash and rinse |
Painter’s tape | Masking edges and fixtures | Use on all frames, sockets, and pipe runs |
Beyond the physical tools, think about your workspace. Move equipment away from walls, cover flooring with dust sheets, and turn off any HVAC systems that could circulate dust back onto surfaces you have just cleaned. Commercial spaces often have more complex layouts than residential rooms, so a clear zone around each wall section makes the entire process faster and safer.
Pro Tip: In commercial environments, always check whether walls contain asbestos-containing materials, particularly in buildings constructed before 1999. If in doubt, bring in a qualified surveyor before sanding or drilling.
Cleaning and inspecting walls thoroughly
Proper cleaning is the foundation of every successful commercial wall preparation job. Skip it, rush it, or do it in the wrong order and nothing applied afterwards will bond properly.
Start at the ceiling and work down. This is not just a tidy habit. Working top to bottom means any loosened dust or dirty water runs down over areas you have not yet cleaned, rather than contaminating surfaces you have already prepared. Use a vacuum with a brush attachment first to pull loose dust and cobwebs from corners and along skirting boards. Follow up with a sponge dampened in warm water and a mild detergent, working in overlapping passes.
For grease and dust in commercial kitchens, canteens, or workshops, a TSP substitute is far more effective than standard household cleaners. Apply it with a sponge, allow it to sit for two to three minutes, and rinse thoroughly with clean water. Residue from cleaning products left on the surface is a common cause of adhesion problems that only appear weeks after the job is finished.
Once the walls are clean, work through this inspection checklist before moving on:
Look for hairline cracks running along joints or in the middle of panels
Check for larger cracks indicating structural movement
Press lightly across the surface to detect hollow spots or bubbling
Note all holes, including those left by fixings or cable runs
Identify areas of peeling paint or flaking texture
Look for moisture staining, which presents as yellow or brown tide marks
Check window and door frames for gaps between the frame and the wall
Confirm that the surface is fully dry before marking up repairs
Allow a minimum of 24 hours drying time after washing before beginning repairs. In damp or poorly ventilated commercial spaces, 48 hours is the safer option. Attempting to apply filler or primer to a surface that is still drawing moisture will compromise both at the same time.
Pro Tip: Take photos of the wall during your inspection. On large commercial sites with multiple rooms, a photo log saves significant time when the repair crew follows behind and needs to find every noted defect.
Repairing and smoothing damaged areas
Once the surface is clean and dry, the repair stage is where the real skill in commercial wall preparation tips becomes visible. The goal is not just to fill holes. It is to create a surface so uniform that no repair is detectable once paint is applied.
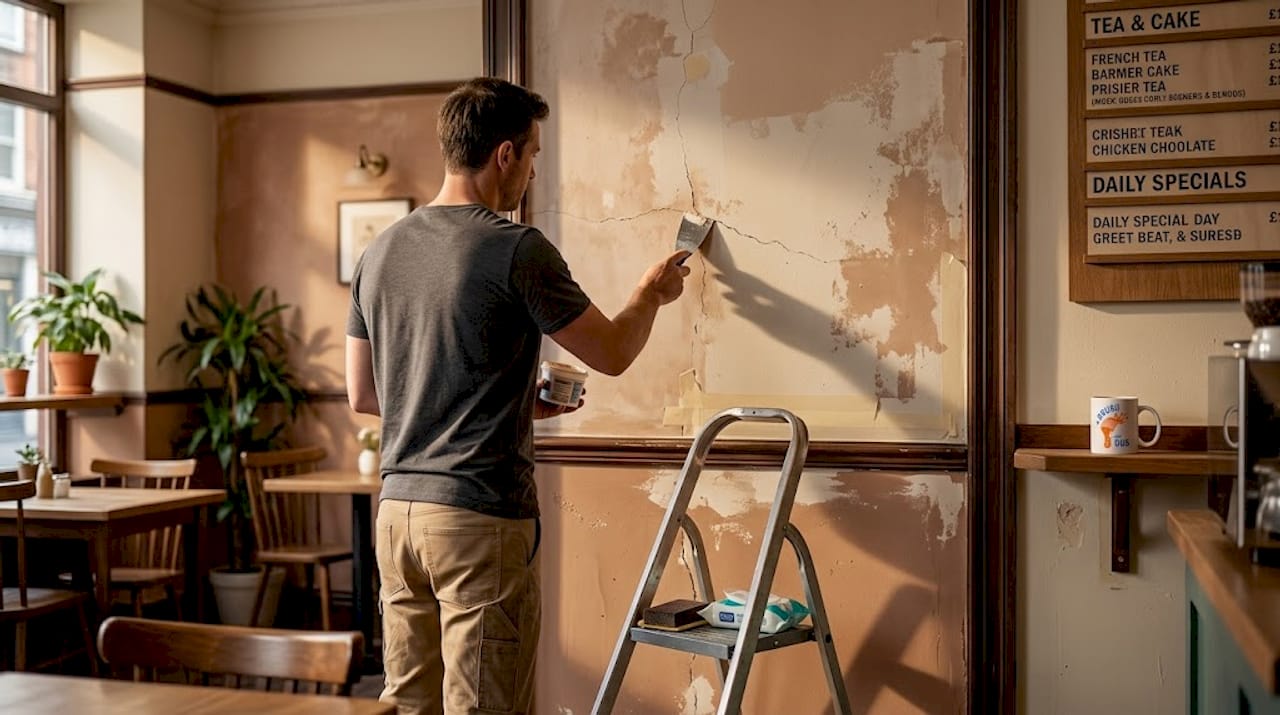
For shallow holes and minor surface cracks, pre-mixed spackling compound works well. For deeper holes or areas where you are filling over a gap wider than about 6mm, switch to a setting-type joint compound. Setting compound hardens through a chemical reaction rather than drying, which means it shrinks far less and provides a stronger base for sanding and priming.
Key techniques for the repair stage:
Apply compound in thin layers rather than one thick fill. Let each layer dry fully before adding the next.
Use a broad putty knife to feather the edges of each repair outward. This blending technique, where filler is thinned to almost nothing at the edges, is what prevents visible repair marks appearing after painting.
For textured walls, attempt to match the texture before priming. Spray textures like orange peel require a can of texture spray and some practice on a scrap surface first, since matching spray textures takes several attempts to get right.
Do not overfill. A slightly underfilled repair that is built up in two coats will always be easier to sand flush than an overfilled repair you have to aggressively remove.
For sanding, start with 120-grit and finish with 150 or 220-grit sandpaper, working in circular motions with a sanding block for flat areas. The sanding block distributes pressure evenly and prevents the uneven hollows that finger sanding creates. Wipe down the entire repaired area with a damp cloth after sanding to remove all dust before priming.
Pro Tip: In commercial buildings with high wall surface areas, consider hiring a pole sander. It reduces physical fatigue and produces a more consistent finish across large, flat sections.
Priming and sealing the surface
Priming is where the steps for painting commercial walls all come together. Apply paint to an unprimed commercial wall and you will see the difference within a year: uneven sheen, patchy colour, and early peeling in repaired areas.
Repaired areas, in particular, are more porous than the surrounding wall. Without primer, they will absorb the topcoat at a different rate, creating dull patches that are obvious even in low light. A coat of primer also creates a uniform base that makes topcoat application faster and more consistent across large surface areas.
Here is a quick comparison of the main primer types used in commercial environments:
Primer type | Best for | Key advantage |
PVA sealer | New plaster or highly porous surfaces | Seals surface and reduces absorption |
Oil-based primer | Stained or water-damaged walls | Excellent stain blocking |
Water-based acrylic primer | General commercial walls after repair | Fast drying, low odour |
Shellac-based primer | Severe stains, odour control | Strongest blocking performance |
While you are at the priming stage, attend to the gaps around outlets, pipe runs, and door and window frames. Caulking penetrations is standard practice in commercial wall preparation, both for finish quality and energy performance. A bead of flexible decorator’s caulk around frames and fittings, smoothed off with a wet finger, takes minutes per room and prevents visible cracks appearing at these joints after painting.
For commercial kitchens or food preparation spaces where hygiene is regulated, consider whether the wall surface itself is appropriate. FRP panels offer non-porous, easy-to-clean surfaces that reduce long-term maintenance costs and meet health compliance standards. Advanced panel systems are increasingly standard in commercial environments where conventional paint finishes are insufficient.
Common mistakes and how to avoid them
Even experienced teams make errors during commercial wall preparation. The most damaging ones are those that only become visible after the topcoat is applied, when fixing them means stripping back and starting over.
Insufficient cleaning. Any trace of grease or detergent residue under primer will cause the finish to lift. Always rinse after using cleaning solutions and allow full drying time before proceeding.
Moving too quickly between stages. Applying primer before repairs are fully set, or topcoat before primer has cured, creates adhesion failures that look like bubbling or peeling weeks later. Read product data sheets for curing times, not just drying times.
Ignoring moisture. Yellow staining on walls indicates moisture ingress that has not been resolved. Painting over it without treating the source will cause the problem to resurface through the new finish.
Working outside the temperature window. Maintaining 65 to 75°F during application is the accepted standard for adhesives and paint bonding. Cold surfaces cause products to go on too thick and bond poorly.
Skipping a primer after repairs. Repaired areas painted without a primer coat will appear duller than the surrounding surface. Always prime after sanding, even if the original wall was previously painted.
Choosing the wrong paint sheen for the environment. Flat paint causes adhesion failure with applied finishes and is difficult to clean. In commercial spaces, eggshell or satin as a minimum is the correct choice.
My take on what most guides get wrong
What I have noticed working across commercial sites in the South West is that most guides treat commercial wall preparation as a bigger version of decorating a bedroom. It is not. Scale changes everything. When you are preparing a corridor running 40 metres or a workshop with three-metre-high walls, the margin for error on any single step is compressed, because one missed area or rushed repair multiplies across the whole job.
The thing I see most often on commercial properties is what I would call the “good enough” trap. A facility manager or contractor gets the walls looking fine from a distance and moves straight to painting. Up close, or worse, under certain lighting conditions, every skipped repair and every unfeathered edge is visible. That is when the complaints start.
In my experience, the single biggest differentiator between a commercial paint job that looks good for six months and one that looks good for six years is the repair and feathering stage. You can get away with a slightly rushed clean. You cannot get away with repairs that were not blended properly. Invest the time in the sanding stage and everything that follows goes on more smoothly, looks better, and lasts longer.
One more thing worth saying: commercial wall prep needs to be scheduled around the building’s actual operational programme. Carrying out dusty sanding work while staff are in the building is not just disruptive. It is a health and safety concern that falls on you as the property owner or facility manager. Plan wall preparation for out-of-hours periods wherever possible, and communicate timelines clearly to building users.
— Angus
Let Abrushwithgus handle it for you

If reading through the preparation process has made you realise just how much is involved, that is entirely fair. Commercial wall preparation done properly is time-consuming, technically demanding, and one skipped step can undo everything that follows. Abrushwithgus offers professional commercial cleaning services and expert wall and surface spraying for commercial properties across the South West. Whether you need a team to handle the full preparation and finishing process or simply want a professional assessment of what your walls actually need, Gus and Rhys are happy to discuss your project and provide a no-obligation quote. Get in touch to find out how we can take the stress out of your next commercial project.
FAQ
What is the first step in commercial wall preparation?
The first step is always thorough cleaning, working from ceiling to floor using a mild detergent or TSP substitute to remove grease, dust, and residue. No repair or primer should be applied until walls are fully clean and dry.
How long should walls dry before priming?
Allow a minimum of 24 hours after washing before applying primer or repair compounds. In poorly ventilated or damp commercial spaces, 48 hours is the safer standard to prevent adhesion problems.
Do commercial walls need a different primer to residential ones?
Commercial walls, particularly those that are repaired or highly porous, benefit from purpose-selected primers such as PVA sealers, oil-based stain blockers, or shellac-based products depending on the surface condition. The right primer choice for your environment is worth checking against a commercial paint guide before you commit.
Why does the temperature matter during wall preparation?
Adhesion products and paints require a working temperature of 65 to 75°F. Outside this range, materials bond poorly, leading to bubbling, peeling, or uneven finishes that appear weeks after application.
When should you use FRP panels instead of painting?
FRP panels are worth considering in commercial kitchens, food preparation areas, or any environment where walls need to meet hygiene regulations and withstand frequent cleaning. They offer a non-porous, low-maintenance alternative where conventional paint finishes would need frequent reapplication.
Recommended
Comments